
How can we help?
Something not working? Listed below, you’ll find quick answers to a lot of the most common questions. Need to know more? Give us a call.
Downloading the New WC TV Gen 2 App?
Click for Instructions:

Antigo office
Wittenberg office

Our commitment to you
At Cirrinity, we care about taking care of you. Whether you’re having problems with your service or simply have questions about your billing, we’re here to make sure you get the help you need.
Frequently Asked Questions
Internet Service
Phone Service
Streaming TV
Follow these steps on your Roku device:
- From your Roku Home screen, press the Home (house) button on your remote.
- Use the arrow buttons to move up to “Search.”
- Arrow to the right to open the on-screen keyboard and type WCTV.
- Look for the WCTV Gen 2 app. It will look similar to the old app, but it will have a black banner in the top-right corner that says “Gen 2.”
- Highlight the Gen 2 app and press OK.
- When the box pops up, select Add app (it should already be highlighted) and press OK to download.
- Once installed, open the app and log in using your WCTV credentials.

Downloading on multiple TVs
- If your other Roku devices are signed into the same Roku account, the app should automatically download to them within 24 hours.
- If it doesn’t appear yet, you can manually search for WCTV on those TVs and select Open app, then log in.
Can’t find the app?
- The app may be added to the bottom of your Home screen. Scroll down through your list of apps to check.
- If you’d like to move the app to a different spot on your Home screen, directions on how to do that can be found here.
You can easily move apps (channels) on your Roku to keep your favorites, like WCTV, right at the top.
- From your Roku Home screen, use the arrow buttons to highlight the app you want to move.
- Press the ✱ (Star) button on your Roku remote to open the Options menu.
- Select Move app and press OK.
- Use the arrow buttons to move the app up, down, left, or right to your desired spot.
- Press OK again to place the app in its new position.
Quick option:
If you just want to move an app straight to the top of your Home screen, press the ✱ (Star) button on the app and select Move app to top from the menu.
💡 Tip: You can repeat these steps for any app to fully customize the order of your Home screen.
To be eligible for Cirrinty WCTV, you need to be a current Cirrinity internet customer with a minimum internet speed of 30Mb.
You can have up to 5 devices registered to your WCTV account. If you’d like to register a 6th device, you can add it for an additional $3 per month (plus tax).
If your TV suddenly starts reading back everything you do, you have enabled the screen reader accessibility feature.
You can turn this off in two ways:
- While in the WCTV app, press the asterisk (*) 4 times in a row. A voice will say “Screen Reader Disabled” when successful.
- If this doesn’t work, click the home button on your Roku remote.
- Arrow up to settings
- Arrow to the right and hover over accessibility
- Arrow to the right and go down to screen reader
- Arrow to the right and highlight off and hit ok so a check mark appears next to off
Still having issues? Give our office a call at (715)623-0558.
For Roku Remotes with a Pairing Button:
- Remove the batteries from the remote.
- Unplug the Roku device from the power outlet for about 30 seconds, then plug it back in.
- Once your Roku device is back on, insert the batteries back into the remote.
- Press and hold the pairing button located inside the battery compartment for about 5 seconds, or until the pairing light starts flashing.
- Wait for your Roku device to recognize the remote and complete the pairing process. This may take up to 30 seconds.
For Roku Remotes without a Pairing Button (IR Remotes):
- Ensure line of sight between your Roku device and remote. These remotes rely on infrared (IR) signals, so there needs to be a clear path.
- Replace the batteries in the remote, making sure they are fresh and inserted correctly.
- After replacing the batteries, try using the remote again to see if it connects with your Roku device.
If the issue persists after these steps, try using the Roku mobile app as a remote or consider replacing the remote if it’s defective. Click here to find a remote that is compatible with your Roku device.
If your Roku voice remote isn’t controlling your TV’s power and volume, you can try these steps within the Roku interface:
Settings > Remotes & Devices > Remotes > [select your remote] > Set up remote for TV control
If this doesn’t work:
- Check your batteries: Make sure they are charged and inserted correctly
- Check CEC (Consumer Electronics Control): Go to your TV’s settings (will need to use your TV remote) and make sure CEC is enabled. Not all TVs support CEC
- Check for updates: Your Roku Player will automatically download the latest software when it checks for updates:
- Press Home on your Roku remote
- Scroll and select Settings > System > Software Update > Check Now
No, an Amazon Fire Stick can not be used to stream the WCTV service.
A good first troubleshoot is restarting your Roku device or TV. Roku devices do not shut off when you turn off your TV and are constantly running. That is why it is a good practice to fully reboot your Roku every so often. Rebooting your Roku will usually clear up issues if you are getting a ‘malinformed data’ or ‘no valid bitrates’ error.
Rebooting your Roku Device
Option One: Simply unplug your Roku Device from the power outlet for 30 seconds and plug back in.
Option Two: If you don’t have easy access to the power outlet you can unplug directly from the Roku box. There will be two different cords you want to unplug the smaller one (make sure it’s the cord that is going to the power outlet is the one being unplugged).
Option Three: If you don’t have access to options one & two you can do this from the Roku itself (but is not as effective).
- Go to Home on your Roku and on the left-hand menu scroll up to Settings.
- Arrow over and up to System
- Arrow to the right and scroll down to Power
- Arrow to the right and scroll down to System restart
- Arrow to the right and hit the middle button between the arrow keys
Your Roku will now restart.
Rebooting your Roku TV
Option One: Simply unplug your Roku TV from the power outlet for 30 seconds and plug back in.
Option Two: If you don’t have easy access to the power outlet you can unplug directly from the TV for 30 seconds and plug it back in.
Option Three: If you don’t have access to options one & two you can do this from the Roku itself (but is not as effective).
1. Go to Home on your Roku and on the left-hand menu scroll up to Settings.
2. Arrow to the right and up to System
3. Arrow to the right and scroll down to Power
4. Arrow to the right and scroll down to System restart
5. Arrow to the right and hit the middle button between the arrow keys
Your Roku will now restart.
MyBundle TV is a tool designed to help you cut the cable and find the best live TV alternatives. With so many streaming options available, it can be confusing to know where to watch your favorite shows. MyBundle TV makes it easy by providing personalized live TV recommendations based on your preferences, helping you save both time and money.
Key Features:
- App Management: Track your streaming expenses, discover special deals, and find new services that match your interests.
- Create a MyBundle Profile: By creating a free MyBundle profile and inputting your current streaming subscriptions, you can quickly discover movies and TV shows across your services, track streaming costs, and build custom watchlists—all in one place.
- Personalized Recommendations: Get tailored movie and TV show recommendations based on what you like to watch.
- Track Subscriptions: Keep track of all your streaming subscriptions and monitor your entertainment costs.
- Share Watchlists: Create custom watchlists and share them with friends and family.
Why Should I Cut the Cord?
- Save Money: The average live TV streaming bundle is 50% cheaper than traditional cable TV.
- Waste Less: Only pay for the channels you actually watch, avoiding unnecessary charges.
- Watch Anywhere: Stream from all your devices, whether at home or on the go.
- No Hidden Fees: Transparent pricing with no surprise charges.
- No Contracts: Most streaming services offer month-to-month billing, so you can cancel anytime.
- Simpler Setup: Watch directly on your smart TV or streaming devices—no big cable box needed.
How to Stream Live TV Channels with MyBundle Free TV:
- Find Compatible Devices: Ensure your device is compatible, such as Roku, Android TV, Fire TV, LG, or Philips Smart TV.
- Navigate and Search: Search for “MyBundle Free TV” in your device’s app store and download the app.
- Open the App: Once downloaded, open the MyBundle Free TV app and start streaming your favorite live TV channels.
Below is a guide to help you navigate and use key features within the WCTV Gen 2 app.
To access these features, go to the Guide within the WCTV Gen 2 app. While in the Guide, use the center OK button on the arrow pad of your Roku remote to bring up the menu options.
Important:
If you are highlighting a show that is currently live, you will need to press and hold the center OK button for about 3 seconds, then release to display the menu. If you only press the OK button once, it will take you directly to full-screen playback of the show instead.
Key Features:
- View Channel: This will take you to the full-screen view of the channel you had highlighted
- Play: This option allows you to replay a show from the beginning, available up to 24 hours back on the guide. Arrow back to the show you want to replay, then press the center ok button and select play
- Record: This will record the show you have selected in the guide. You can record as far ahead as the guide allows, but it will only record the one show you have highlighted.
- Add to Favorites: This option will add the current channel to your favorites. When you go back to the menu and select Channels, you can use the left and right arrow keys to select which Favorites list you want to look at showing you only the channels you’ve added, making it easier to find your preferred channels.
By using these features, you can customize your viewing experience and make it easier to navigate and enjoy the WCTV app! For a more in depth look into all the new features of our Gen 2 app take a look at our WCTV Key Features Guide.
Cirrinity Protect App
The Cirrinity Protect App is the remote control for your internet. Here you can take control of your home network. Set restrictions, priorities, add guest networks, run speed tests and so much more.
Cirrinity Protect App is available in the Google Play & App Store
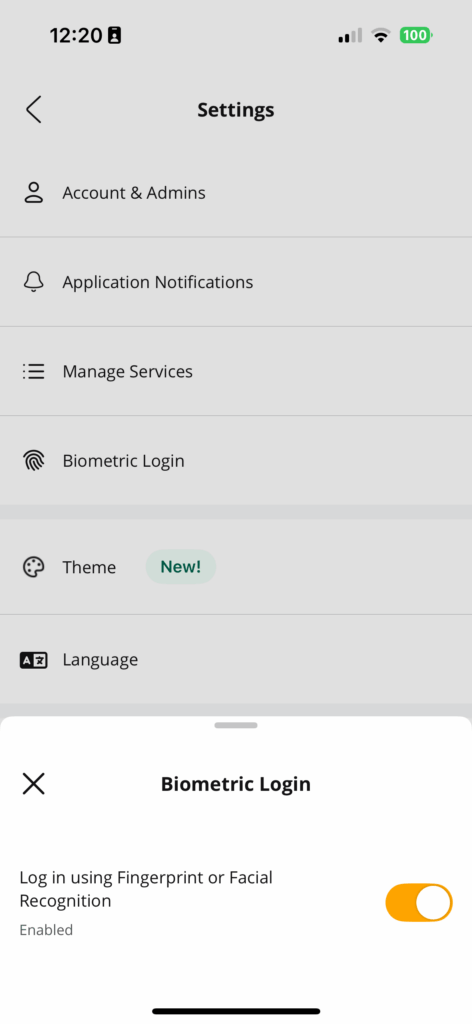
Yes, you can use biometrics to log into the app, in lieu of an alphanumeric
password. If you prefer to use biometrics for login, you can enable the option from the Settings
screen.
To set enable a biometric login:
- Go to Settings > Biometric Login.
- Select the Log in using Fingerprint or Facial Recognition toggle to enable (turn the toggle blue).
- Tap the close icon to return to the Settings menu.
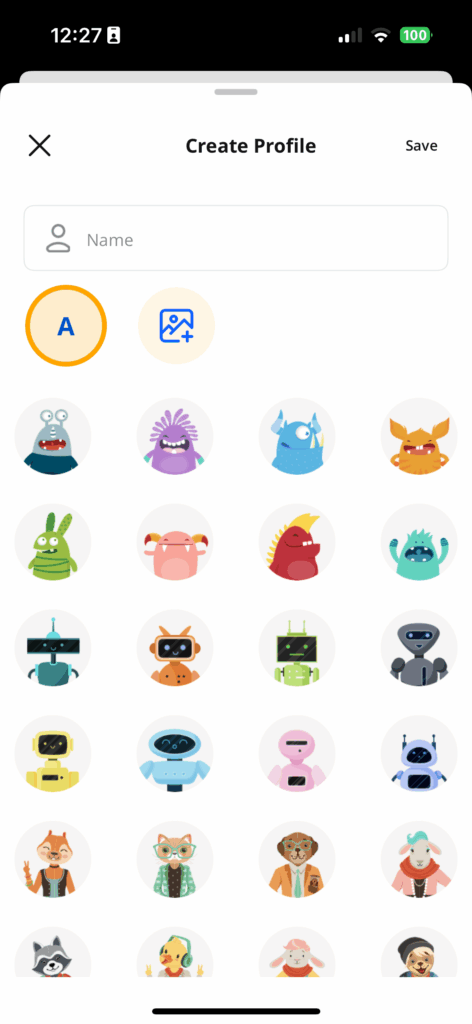
User profiles are designed to store network preferences pertaining to parental controls and
device/services usage.
To add a person:
- Tap the People icon in the bottom menu bar.
- Tap on the Plus sign.
- Tap into the Name field to add the person’s name.
- Tap on the desired profile avatar to ass a profile image.
- Tap Save.
To edit a person:
- Tap the People icon in the bottom menu bar. Alternately, tap on the desired profile from the Home screen.
- Tap on the desired person.
- Tap on menu icon.
- Tap Edit Details.
- Edit the person’s information.
– Tap into the Name field to edit the person’s name.
– Tap on the desired avatar to change the person’s profile image. - Tap Save to save your changes and return to the People screen.
- To update the assigned device(s), tap on Modify. Select/unselect the devices from the list.
To delete a person:
- Tap the People icon in the bottom menu bar. Alternately, tap on the desired profile from the Home screen.
- Tap on the desired person.
- Tap on menu icon.
- Tap on Edit Details.
- Tap on Remove Person.
- Tap Yes, Delete Profile to confirm
To edit device settings:
- From the Devices screen, tap on the desired device.
- To associate a person with the device:
a. Tap on Assign to Person.
b. Select the desired profile(s) from the list and tap on Save.
c. If you want to modify the belongs to list, tap on Modify. Select or remove the desired profile
and tap Save. - To edit the device information:
a. Tap on the menu icon, then tap on Edit Details.
b. You can update the device name and change the device type, tap on Save to save your
changes.
MyPrioritiesIQ allows a user to prioritize network traffic based on application type and prioritize
devices on the network. Before enabling MyPrioritiesIQ, a bandwidth test must be run on the BLAST
system. The results of this test are used to set the upstream and downstream bandwidth limits for
each queue used by MyPrioritiesIQ. The user can then rank the priority of applications on the
network.
To access MyPrioritiesIQ, from Home screen tap on Services and then tap on MyPrioritiesIQ.
Alternately, from the Home screen tap on MyPrioritiesIQ.
Application categories, with specific examples, include the following:
– Work: Zoom, Microsoft Teams®, Microsoft Office 365®, etc.
– Browsing: HTTP, SMTP, POP3, DNS, etc.
– File Transfers: FTP, iCloud®, Dropbox®, etc.
– Entertainment: Netflix®, Spotify®, Hulu®, etc.
– Gaming: Call of Duty®, Diablo®, Counter Strike®, etc.
– P2P File Sharing: BitTorrent™, eDonkey, etc.
Schedules can be created to prioritize applications based on the time of day and day of the week. A
user can have a workday schedule where Work & Browsing have the highest priority and then an
evening schedule where Video & Gaming get a higher priority.
Individual client devices (up to five) can be added to a device priority list. Client devices in this list
will have all traffic, regardless of application, set with the highest priority.
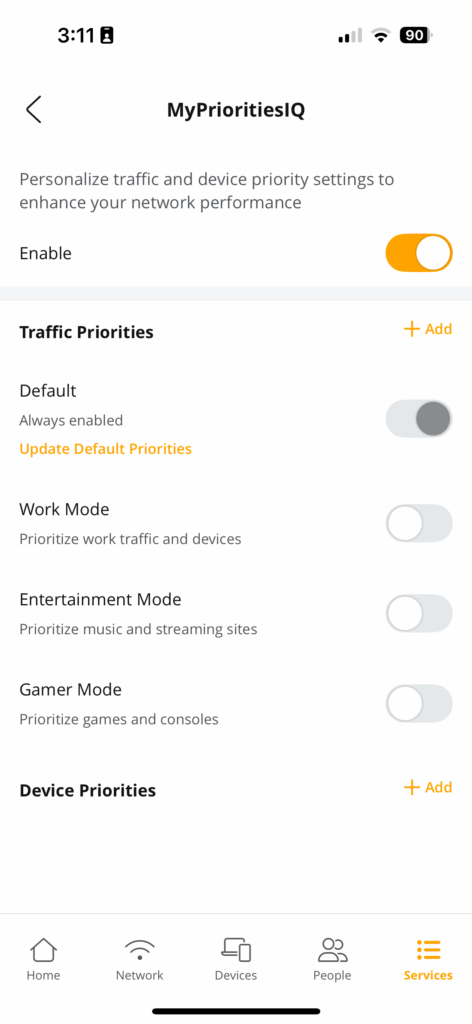
Traffic Priorities
Cirrinity Protect allows you to customize how your network handles different types of traffic to match
your needs. You can prioritize work, entertainment, or gaming activities with preset modes or create
your own. You can also activate priorities and schedule them for optimal performance.
Preset Modes:
– Default Mode: Selects the default list of priorities. Tap on Update Default Priorities to
customize the default traffic priority list to suit your specific needs. This mode is always
enabled by default.
– Work Mode: Prioritizes traffic related to productivity tools, collaboration platforms, and
work-related applications. Ideal for remote work, virtual meetings, and document sharing.
– Entertainment Mode: Gives preference to streaming services, music platforms, and mediarich content. Use this mode to enhance your experience while watching videos or listening
to music.
– Gamer Mode: Optimizes traffic for online gaming and console connectivity. Reduces
latency and improves responsiveness for a smoother gaming experience.
To enable a preset priority and set duration:
- Enable the toggle (turn the toggle blue) for the desired priority.
- Select the day(s) of the week that you want the traffic priority applied.
- Tap into the From field to set the start time.
- Tap into the To field to set the end time.
- Tap Save.
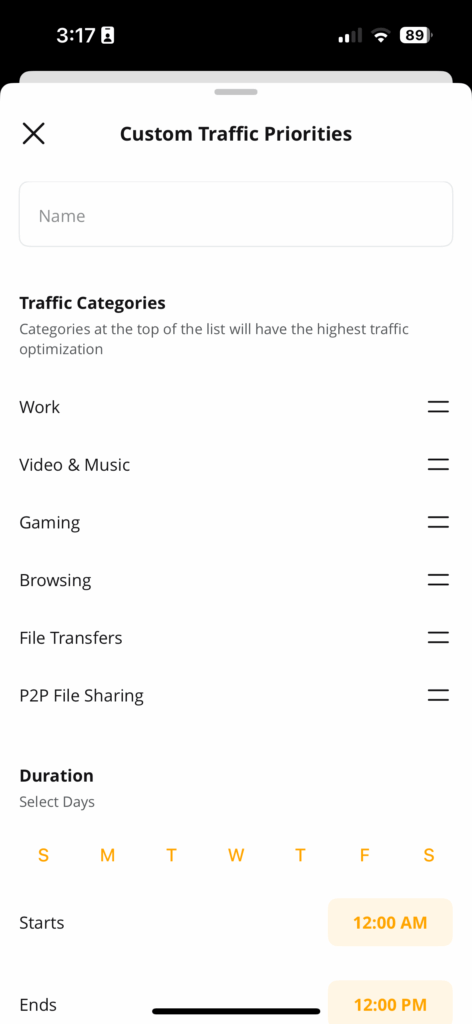
To add a custom traffic priority:
- From the Home screen, tap MyPrioritiesIQ tile.
- Tap +Add adjacent to Traffic Priorities.
- Enter a name for the traffic priority into the Name field.
- Drag and drop the various categories of traffic to reflect the priority you wish to give them.
- Select the day(s) of the week that you want the traffic priority applied.
- Tap into the From field to set the start time.
- Tap into the To field to set the end time.
- Tap Save.
To delete a priority:
- From the Home screen, tap MyPrioritiesIQ.
- To delete a custom priority, disable the toggle (turn the toggle grey) for the desired priority.
Device Priorities
Individual devices can harbor their own priorities. Up to five devices can share the same priorities
(the default priorities has no limit).
To add a device priority:
- From the Home screen, tap MyPrioritiesIQ.
- Tap +Add adjacent to Device Priorities.
- Select the device(s) from the list.
- Select either Always On or Set Duration.
– If Set Duration is selected, tap into the Duration field to set the length of time the traffic will
be affected. - Tap Save.
To delete a device priority:
- From the Home screen, tap MyPrioritiesIQ.
- From Device Priorities list, swipe the desired device priority to left and tap the trashcan icon.
You can set up additional secondary Wi-Fi network from the Add Network menu selection. Creating
a secondary Wi-Fi network allows you to provide Wi-Fi internet access to visitors without providing
the credentials to your home’s primary Wi-Fi network.
Secondary networks can be configured to support a wide range of network types. By default, three
secondary network types are listed in the secondary networks table:
– Guest Network
– Work From Home
– Custom Network
To add a guest Wi-Fi network:
- From the Network screen, tap on Add Network.
- Select Guest from the Network Type drop-down menu.
- Enter a new Network Name (SSID).
- Select a Security Type:
– None
– WPA2-Personal
– WPA-WPA2-Personal
– WPA2-WPA3-Personal (default)
– WPA3-Personal - Enter the Wi-Fi Password.
- Tap to disable Isolation. By default, this option is enabled for guest networks.
Note: The Isolation option provides added security in that you can choose to isolate this
network from other networks as appropriate. - Set the access duration time for this network. Being this is a guest network, normally the
duration will tend to be quite short.
– Permanent: For guest networks that are permanent in nature. All guests entering the
network will use the Guest SSID and password. The guest network will always be on and
anyone within range can access this network.
– Temporary: Establish a start date & time and a stop date & time for this network. - Tap Save when finished.
To add a Work From Home network:
- From the Network screen, tap on Add Network.
- Select Work From Home from the Network Type drop-down menu.
- Enter a new Network Name (SSID).
- Select a Security Type:
– None
– WPA2-Personal
– WPA-WPA2-Personal
– WPA2-WPA3-Personal (default)
– WPA3-Personal - Enter the Wi-Fi Password.
- The Prioritization and Isolation options are enabled by default and cannot be disabled.
Note: The Isolation option provides added security in that you can choose to isolate this
network from other networks as appropriate. - Tap Save when finished.
To add a custom Wi-Fi network:
- From the Network screen, tap on Add Network.
- Select Custom from the Network Type drop-down menu.
- Enter the Network Name (SSID).
- Select the Band:
– All (default)
– 2.4G
– 5G - Select the Security Type:
– None
– WPA2-Personal
– WPA-WPA2-Personal
– WPA2-WPA3-Personal (default) - Tap to enable Prioritization.
- Tap to enable Isolation. By default, this option is disabled for custom networks.
Note: The Isolation option provides added security in that you can choose to isolate this
network from other networks as appropriate. - Tap Save when finished.
You can share network access information with users via following methods:
– QR code: Presents a QR code for the user to scan with their device.
–Text message: Sends a text message to the user’s phone that includes a QR code, links to iOS
and Android QR scanner applications, and the Wi-Fi network SSID and passphrase.
To share network access via QR code:
- From the Home screen, navigate to Network. Alternately, from the Home screen, tap on Share
Wi-Fi. - Tap on the desired network from the Wi-Fi Networks tab.
- Scan the QR code to join a mobile device to the network.
To share network access via text message:
- From the Home screen, navigate to Network. Alternately, from the Home screen, tap on Share
Wi-Fi. - Tap on the desired network.
- Tap on Share.
- Select the desired option and contact from your device to send the message.
To join a mobile device to the network via text message:
- Open the text message and note the wireless SSID and password.
- From the device’s wireless settings, connect to the SSID using the password provided.
From the Network screen, you can edit a network’s SSID, password, and security type.
To edit network settings:
- From the Home screen, tap on Network in the bottom menu bar.
- Tap on the desired network.
- Tap on Edit Network.
- Edit the network name (SSID), password, and security type.
- Tap Save.
To remove a network:
- From the Home screen, tap on the Network in the bottom menu bar.
- Tap on the desired network.
Note: You cannot delete the primary network from the app. - Tap on Remove.
- Tap Yes. Wait for deletion of the selected network.
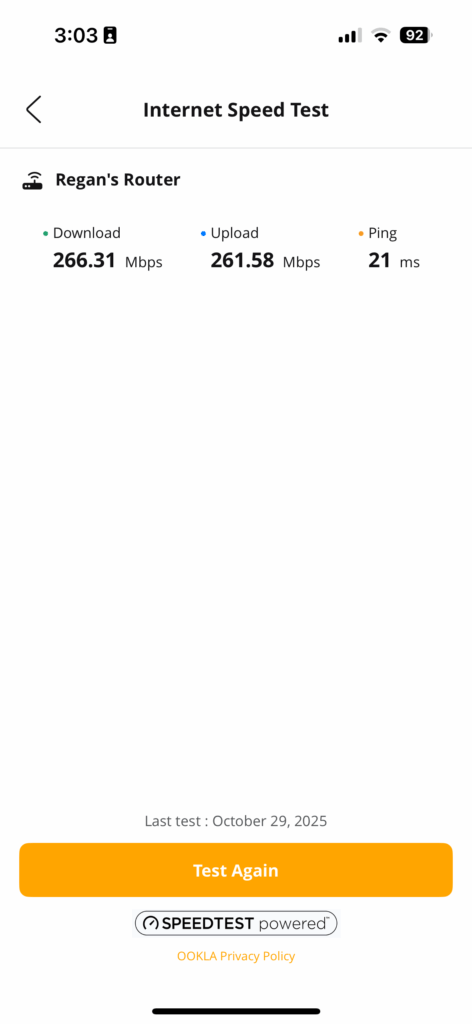
The Speed Test screen displays the latest speed test results, including download/upload speeds
and latency. Note that the numbers displayed reflect the previous speed test.
To run a speed test:
- From the Home screen, tap Speed Test.
- Tap Run Test.
Note: The Run Test button text changes to indicate test progress. - After the test completes, results for all equipment in the network are displayed.
a. Download Speed
b. Upload Speed
c. Ping Time
Additional Notes
- The blue dot adjacent to the router’s name provides visual confirmation that the bandwidth test
is in progress. - Results for the speed test are used for setting speed queues used for MyPrioritiesIQ.
- Satellite speed is measured to the RG, not to the internet and can vary based on wireless
conditions. If satellite speed is low, try moving the satellite to get a better Wi-Fi connection to
the RG. Check Network > Network Systems> Mesh(SAT) > Additional Details to see the Wi-Fi
signal strength and backhaul PHY rates.
From the Devices screen, you can edit a Device’s name and associate the device with people.
To edit device settings:
- From the Devices screen, tap on the desired device.
- To associate a person with the device:
a. Tap on Assign to Person.
b. Select the desired profile(s) from the list and tap on Save.
c. If you want to modify the belongs to list, tap on Modify. Select or remove the desired profile
and tap Save. - To edit the device information:
a. Tap on the menu icon, then tap on Edit Details.
b. You can update the device name and change the device type, tap on Save to save your
changes.
A user with a Parental Control profile can have service paused or resumed from the main People
screen.
Guidelines
– Profiles that are paused remains in that state until manually resumed.
– You can add additional time for a blocked profile that has exceeded their access time (in 30-
minute increments).
– Specific applications cannot be paused; only the user profile can be paused.
Note: Internet access for Devices can be controlled either globally from the Person profile or
individually from the device profile. However, if a device is paused from the device profile,
unpausing the Person does not unpause the device.
To pause/unpause internet for a device:
- From the Devices screen, tap on the desired device.
- To pause internet for device, tap on the menu icon, then tap on Pause Internet.
- To unpause internet for device, tap on the menu icon, then tap on Unpause Internet.
To pause/unpause internet for a person:
- From the Home screen, tap on the desired profile.
- To pause internet for profile, tap on Pause Internet.
- To unpause internet for profile, tap on the profile then tap on Unpause Internet.
To set internet time limits for a person:
- Tap the People icon in the bottom menu bar. Alternately, tap on the desired profile from the
Home screen. - Tap on the desired person.
- Tap on the menu icon, then tap Set Time Limits.
- Select one of the following options:
– No Time Limits (default): Allows the person unrestricted internet access.
– Everyday: Set a daily time limit for internet access. Any device(s) associated with the
person will not be able to access the internet outside of the selected hours. For example, if
you select 7:00am to 9:00pm, the person has internet access every day from 7:00am to
9:00pm. Between the hours of 9:00pm and 7:00am, none of the devices associated with the
person will be able to access the internet.
a. Select a Start Time and an End Time.
b. Tap Save.
– Custom: Set a different time limit for each day of the week.
a. Tap on a day.
b. Tap + Add Time Range.
c. Select a Start Time and an End Time.
d. Tap Submit.
e. Repeat for the remaining days. - Tap Save.
What is Safe Search and YouTube Restricted Mode, and how do they work in Cirrinity Protect?
SafeSearch and YouTube Restricted Mode are tools that help block explicit or inappropriate content across search engines and YouTube. They’re build into platforms like Google and Bing and can be toggled on in Cirrinity Protect for either the whole network or specific user profiles.
These filters use smart algorithms to block inappropriate images, videos, and websites. While they do a good job, no filter is perfect, new content can sometimes sneak through. That’s why these tools are best seen as an extra layer of protection.
If you ever spot something inappropriate that slips through, you can report it directly to the search engine:
How do I block tools like DNS over HTTPS (DoH) and iCloud Private Replay to ensure restrictions work?
Some devices and apps use features like DoH or iCloud Private Replay to hide online activity. These can get around parental controls.
Cirrinity Protect lets you block these tools so they don’t bypass your filters:
- DoH encrypts DNS traffic, hiding what sites a devices is visiting.
- iCloud Private Replay works like a VPN and encrypted DNS combo for Apple devices.
Blocking these helps keep your restrictions in place. When you block DoH or Private Replay in Cirrinity Protect, devices will either revert to normal behavior or lose access until the settings are changed.
Note: If DoH is enabled, SafeSearch and YouTube restrictions may not work correctly.
How can I tell if filters and restrictions are active?
You can check if filters are working in a couple ways:
- Tap the SafeSearch and YouTube toggles in Cirrinity Protect to ensure they’re on.
- Visit these links from a filtered device:
- YouTube Restrictions Check
- Google SafeSearch Settings
- On Bing: Go to bing.com, open the menu, tap “SafeSearch”, and verify it’s set to ‘Strict.”
What are Global Restrictions and how do I set them up in Cirrinity Protect?
Global Restrictions apply filters across all devices not assigned to a person’s profile. You can set age-appropriate limits with recommended presets for:
- Child (0-8)
- Pre-teen (9-12)
- Teen (13-18)
To set up Global Restrictions:
- Tap the ExperienceIQ tile.
- Tap Network Restrictions.
- Turn on filters like SafeSearch, Youtube Restricted Mode, Block DoH, and Block iCloud Replay.
- Adjust Content categories (like Entertainment, Privacy, or Sensitive Content).
- Add specific apps and website to block or allow.
Note: Global settings do not apply to mesh systems, set-top boxes, phones, or profiles already assigned to a person.
How Can I apply restrictions for specific people or devices?
Want different rules for each family member? No problem! You can set personalized restrictions with user profiles in Cirrinity Protect. These override global settings.
To set up restrictions for a person:
- Go to ExperienceIQ > People Restrictions.
- Choose a profile and tap Manage Restrictions.
- Enable/disable options like SafeSearch, DoH blocking, and app or website filters.
- Pick an age group and customize content settings.
- Add apps or websites to block, allow always, or allow for limited time.
Note: Only some categories send alerts (like pornography, gambling, violence, and VPNs).
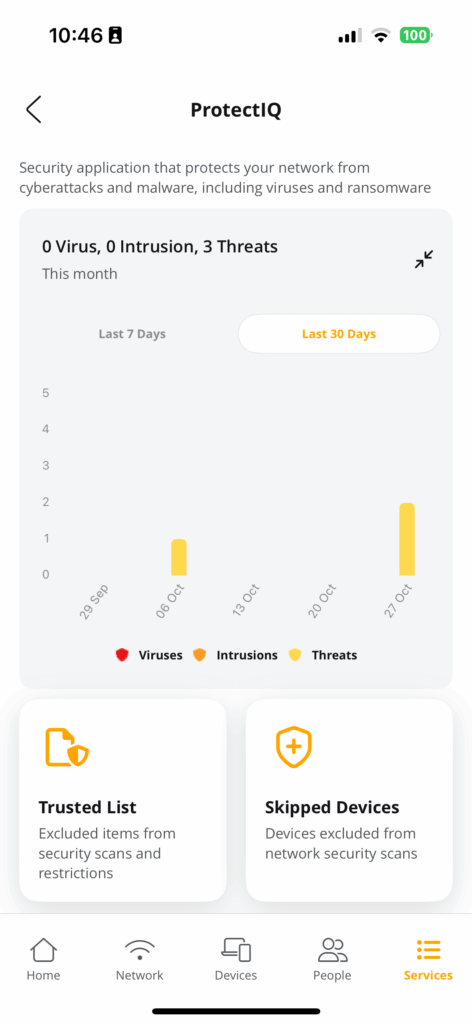
ProtectIQ is a security feature in Cirrinity Protect that helps protect your home network from online threats like viruses, malware, suspicious websites, and intrusion attempts. Think of it like a security guard that’s always scanning your network in the background.
To use it, just go to the Home screen > ProtectIQ tile, where you can manage:
- Trusted List – devices or sites you want to allow
- Skipped Devices – devices you don’t want scanned
- Intrusion Settings – adjust how aggressively ProtectIQ blocks suspicious activity
Heads-up: You’ll only see ProtectIQ in your app if the service has been enabled and subscribed to. Give us a call if does not show up in your menu.
To view Security Data:
- From the home screen, tap on the ProtectIQ tile. Alternately, tap the Services icon in the bottom menu bar and tap on ProtectIQ.
- Tap on the expand icon.
- Select Week, or Month to view historical security data for virus, intrusion, and threat data.
The Trusted List screen displays the list of entities, such as files, websites, or devices that are deemed safe and are excluded from security scans and restrictions. When a GigaSpire BLAST flags a security issue, the user can add it to a Trusted List from the notification tab. If a threat is detected that you know is safe, you can add or remove sites from the Trusted List. Cirrinity Protect displays sites or services
based on security notifications.

The Skipped Devices feature allows you to turn off ProtectIQ scans based on selected client
devices. The Skipped Devices screen displays a list of devices connected to and learned by the
BLAST system. These devices are arranged into device Type/Name categories. After initial
detection and scan, you can add learned device to the appropriate category so that network traffic
coming to or from the device is no longer scanned again by ProtectIQ.
To skip security scans:
- From the Home screen, tap ProtectIQ.
- Tap Skipped Devices.
- A list of network devices displays. You can sort the list by Type or by Name from the drop down. You can also search the device in the search bar.
- Select the checkbox for each device you wish to skip security scans. For convenience, you can tap Select All to select and skip all devices at once.
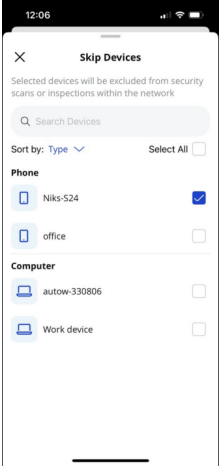
Note: Intrusion settings continue to monitor skipped devices.
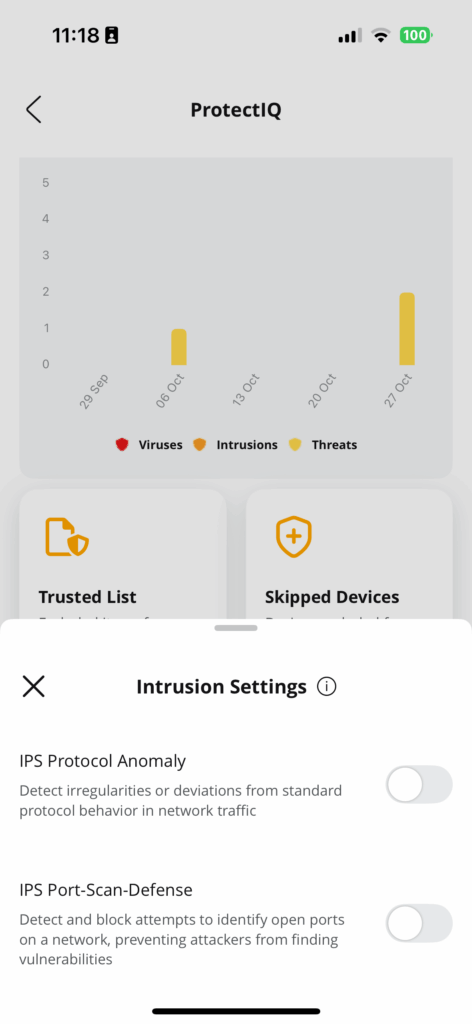
Intrusion Settings in ProtectIQ are like having a digital bouncer for your home network. They help spot and block suspicious behavior before it can do any harm, keeping your internet connection safer for everyone.
There are to main features under Intrusion Settings:
🔐 IPS Protocol Anomaly
This watches for strange or risky traffic that doesn’t follow the normal rules of the internet. For example, it can block things like:
- Bad checksums (used to verify data integrity)
- Suspicious HTTP behavior
- Incorrect IP headers or packet sizes
It learns what “normal” traffic looks like and flags anything unusual, like a computer software trying to behave in a sneaky way.
🔍 IPS Port Scan Defense
Port scans are like something rattling all the doorknobs on your house to see if any are unlocked. This setting blocks those kinds of scans, which are often used by bots or hackers to find weak spots.
It can stop:
- TCP and UDP scans
- Flood scans (lots of traffic at once to overwhelm a device)
- Other common probing attempts
Good to know: These settings monitor all devices – even ones marked as “trusted” or “skipped” – so your whole network gets extra protection.
Turning these on adds another strong layer to your network’s defenses, working quietly in the background to block risky traffic before it becomes a problem.
To enable Intrusion settings:
- From the Home screen, tap on the ProtectIQ tile. Alternately, tap the Services icon in the bottom menu bar and tap on ProtectIQ.
- Tap on the Intrusion Settings tile.
- Select the desired service toggle to enable (turn the toggle blue).
- Tap the close icon to return to the Settings menu.
You may see entries in your Things that consist of a string of numbers and/or letters. This may happen for devices that do not send identifying information to the GigaSpire when they join the network. Typically, the string of numbers and/or letters displayed in the Cirrinity Protect App is the hardware address (also known as the MAC address of the device. The MAC address is typically found on a sticker on the device or, if the device has a management interface, somewhere in the network settings.)
To properly identify the device, compare the device MAC address to the string of numbers/letters listed in the Cirrinity Protect App. To locate the MAC address in Cirrinity Protect, go to Devices, select the device, then tap the three lines in the top right hand corner and select Device Information.
Once you’ve identified what device it is you can go back into the three lines in the top right corner and this time tap Edit Details and name the device.
Each time Cirrinity Protect detects a threat, you will receive a notification with details about the content that was blocked. All threats are automatically blocked, so you do not need to do anything. However, if you want to view more information about the specific threat, this information will include the time the threat happened, what type of threat it was, the source IP from where it came, what action was taken, which device the threat was trying to get to and the URL. You do not need to do anything; all threats are automatically blocked.
Notifications help keep you updated on what’s happening with your network. To check them:
- Tap the Notifications icon on the Home screen.
- You’ll see a list of alerts and messages related to your network.
- Tap any item to view more details or delete it using the trashcan icon.
You can also:
- Tap Select > Select All to mass mark as read or delete.
- Use the All button to filter notifications by type.
Note: If you filter the list and hit “Delete All” it will delete all notifications, not just ones shown in the filter.
To adjust how you get Cirrinity Protect notifications, check your Application Notification Settings.
Simply turn off Wi-Fi on your phone and wait for it to connect to the cellular network. You can then enter the app and select the check mark icon to turn your profile back on. We would recommend that you remove your phone as a device from the profile if you do not want to accidentally turn yourself off.
You an add a secondary (administration) account to the network.
To create a secondary account:
- Navigate to Settings > Account and Admins.
- Tap Add Admin.
- Input the user’s first name, last name and email address.
- The email addresses must be unique. If your email is already in use, enter a known unused address.
- Tap Send Invite. An email is sent to the secondary account asking for verification of acceptance.
- After the email is sent, the secondary account status switches to Pending until the Invitee accepts.
To delete the secondary account as the primary admin:
- Navigate to Settings > Account and Admins.
- Tap Edit Account Information.
- Tap the trashcan icon and confirm the account is to be deleted.
- An Are you sure you want to remove the secondary admin? message displays prior to deletion.
- To confirm the deletion, tap on Yes, Remove Admin.